RSS

A funny thing happened...

on the way to the stamp table :) Ok so that sounded funnier in my head LOL

I was working on today's challenge, the Featured Stamper one... oh if you haven't checked out ked's gallery, you should! It's really awesome! Oh yea, back to my post LOL I found the card I wanted to CASE and got working on it. I changed it around to suit my needs and I LOVE they way it turned out!

I turned the card to make it vertical, so I could use my giraffe from Bundle of Joy (LOVE that set!) The card base is Bashful Blue with the edges DTP with white craft ink. When I do this I don't really swipe the ink I kinda just push the piece into the foam of the ink pad, I seem to get a nicer look that way. Then I used my mat pack (LOVE it!) to poke the holes down the edge. The giraffe is colored with ink from the ink pad lids and a watercolor brush. I tried with my aquapainter, but it just got all runny and messy, the paint brush worked out much better this time!
My favorite part is the little MM clip do-hicky. It actually came with the Halloween set, but since it has a moon on it, I thought it would be perfect! I added a little piece of So Saffron under the moon so the moon is yellow :) Then I tied some ribbon around the edge. The focal piece was a bit too wide for the clip to be centered where I wanted it, so I trimmed away a tiny little piece of the Saffron mat to make it fit :)

I chose my sentiment, I really love using the Warm Words with EFP. I don't know why, but I think it's neat LOL! Then I realized I needed a strip behind the focal image. I found some large white rickrack and ran it through my Xyron X. I added 2 Bashful brads to finish that part off.

So now I'm done and need to take a picture of my card. No biggie, I do this all the time! I get my little area all set up; one piece of white paper on the desk and one piece upright supported by whatever I can find, then I get my OTT light down and aim it at the card. Usually this works perfectly and I get really nice shots. Well today the sun happened to be shining in the window and I kept getting a reflection ring on my picture. So ok I decided to turn the whole thing around so the sun was shining on the card. No biggie, it's easy to do. But taking the picture from that angle is a bit harder. So I get myself all situated and lean over on my desk and take the picture. GREAT shot!
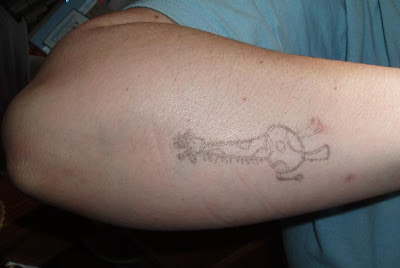
An hour later my DH comes up to me and says "Hon, what's that on your arm?" Huh??? what are you talking about? "It looks like a tattoo!" So look at what happened when I was taking the picture! I had used my lego-ma-jig to get the giraffe placed just right on the paper and since the clear part I use is acrylic the ink didn't fully dry LOL SO now I have a Basic Black Bundle of Joy giraffe on my arm! LOL

Ribbon, Ribbon, Ribbon!!!!

Who wants some ribbon???? ME, ME, ME!

Here are the colors I can get:

Soft Subtles
Pale Plum (close)
Pretty in Pink
Barely Banana
Certainly Celery
Bashful Blue
Almost Amethyst (close)

Bold Brights

Glorious Green (close)
Green Galore
Gable Green
YoYo Yellow
Only Orange
Real Red
Pink Passion
Orchid Opulence(close)
Lovely Lilac
Brilliant Blue
Tempting Turquoise

Earth Elements

Chocolate Chip
Creamy Caramel
More Mustard
Really Rust
Ruby Red (close)
Cameo Coral
Summer Sun (close)

Rich Regals

Ballet Blue
Night of Navy
Taken with Teal
Handsome Hunter
So Saffron
Regal Rose
Bravo Burgundy (close)

Neutrals

Kraft
White
Black
Very Vanilla (close)
Going Gray

In Colors 2007
Buckaroo Blue
Caribbean
(NOTE: the ribbons are NOT SU ribbons, but match the colors very well!)

If it says (close) next to the color, it's because the ribbon doesn't match perfectly, but it's VERY close! I checked them under my OTT light :) I'm really picky about color matches and I'd use these colors!

These are all 1/4" grosgrain ribbons.

The cost is $1.05 for 5 yards. EDITED TO ADD: There has been some confusion about the amount of ribbon you can order. I'm selling the colors in 5 yard increments. So the smallest amount you can order is 5 yards of each color you'd like! PayPal only please, it's just easier for me. I can take Credit cards through my Paypal account! Shipping and a small Paypal fee will be added to your total once I know how many yards you'd like. Please e-mail with your choices (my e-mail is next to my name in the Copyright section to the right.) If you could put ribbon in the subject line, that would help a TON! Canadians welcome!

This is the first time I'm doing a ribbon share, so please bear with me :) I'll try to get it out as soon as I possibly can, but there might be delays that I cannot foresee.

Because this is my first share, I'll need to sell at least 30 - 35 yards per color in order to get the discounted price. If I don't get the 30 yards, I'll let you know before I order the ribbon. I don't see this being a problem, but I wanted to be upfront and honest with everyone :)

Once the share is filled, I will post the payment instructions, my paypal addy etc...

Pergamano attempt

Wow what a stunning craft! After I saw today's tutorial, I thought, "I can do that!"(I seem to think that a lot about crafts LOL) Anyway, I went searching online for any patterns I could find, and more instructions and such and then after being totally overwhelmed by the sheer beauty of this craft I decided to use the K.I.S.S method! (Keep it Simple Stupid!)I always want to make the fanciest, most perfect piece the first time out and that's never going to happen LOL

This is a case of needing the right tools for the job. And I did NOT have the right tools for this technique! I used your basic 2-sided embossing stylus and regular vellum CS.

My first thought was "Oh Parchment paper, like what I use for baking. I have that!" and I grabbed some from the kitchen to try and it was WAY too thin! I tore through it the first try and I was being VERY gentle! Then I actually READ the instructions and realized that I needed my Vellum. Ok ok, so I'm a bit impatient sometimes. Anyway, once I got the right (or at least closer to right) paper, it went a bit easier. You still have to be SUPER careful not to tear through the vellum. It rips SO easily!

I have the whole thing done and then I decided it needed more. (Why can't I leave well enough alone?) So I poked tiny little holes randomly in the centers of the flowers with a pin. It looked "ok", but not that great. So I then decided to cut out the centers. WHY??? Again, if I'd had the right tools, it might not have taken an hour and a half just to cut out those little pieces! I used my Coluzzle blade and paper snips. Oy!

Ok now that part was done, what do I DO with it? I had originally had made it to lay over the card base, but quickly realized that wasn't going to work right, so I trimmed the focal piece off and started playing around with it. I finally decided "Less is More" and attached it to the Night of Navy card base using my Glue Pen! (Love that thing!)

So there's my first attempt at Pergamano. Like I said, it looks ok, just needs something, but I'm not entirely sure what.

Coaster Box Prismacolor Pencil holder

So I'm in the middle of trying to get my stamping space organized and I decided I needed a better way to hold my Prismacolors and such, so I came up with this cute little box!


The basic box is the same as you've seen in a gazillion galleries and blogs, but the center divider and Gamsol holder are mine :)

You need:
8 4" medium weight coasters
15 4" squares of PP
small corner rounder
Modge Podge (I like the Matte)
a large-ish paint brush
sanding block
20 4" - 5" lengths of ribbon
good scissors or kraft knife (I used my Kai's and they worked great!)
a ruler, a centering ruler is nice if you have one
a hole punch (I used my Crop-a-dile)
good strong glue (I used Glossy Effects, basically CE)
2 6" lengths of 1/4" elastic

First thing you want to do is use the corner rounder and round the corners of your PP. Then adhere them to the coasters using the Modge Podge. I like to use a fairly thick layer so it stays wet and if I mess up the placement of the PP, I can move it around a tiny bit. Then I put a piece of CLEAN copy over the top and rub so there are no bubbles. I also use my brayer to make sure the PP is down really well. Do this to both sides of 7 of the coasters and 1 side of the last one, this is the bottom of the box.

Let these dry. I like to weigh them down while they are drying so they stay flat. If you don't, they will warp slightly and that just doesn't look as good. Once they are dry, decide which 4 will be the sides and which 3 will be the center divider pieces. Sand down the edges and corners for a shabby-chic look.

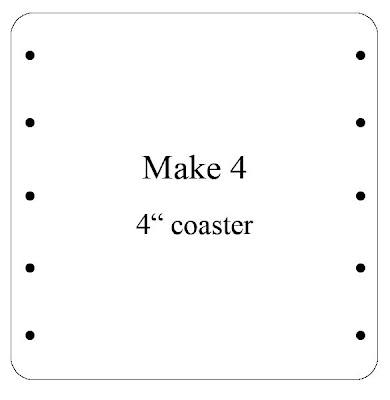
Using the templates as guides (these are NOT to scale, please go by the measurements!) make the 4 side pieces. You need 5 holes in each side. I used my Mat Pack to get them even on mine. Punch out holes with hole punch or Crop-o-dile.


Again using the templates as guides, make the 3 center divider pieces. I used my Kai scissors to cut the slits and they worked perfectly! You want to make the slits the width of the coaster, maybe "slightly" thicker. And only go down about 2 inches. These slide onto each other creating the 6 spaces for the pencils, stumps and sharpener to go in.


Now you want to make the box. If you are adding the holder for the gamsol, take the elastic and poke one piece through the 2nd and one piece through the 4th holes down and tie a knot in the back. Run them across the front and poke it through the same holes on the other side, pull taut and tie another knot. You want the knots to be on the inside and the elastic to have a little bit of give, but slack enough so that you can fit the Gamsol bottle in. Now you can construct the box. It's pretty self explanatory. For the bottom, I take the last coaster, the one with one one side covered with PP and kinda force it into the bottom, PP side up. Then I run a bead of CE around the seams. Let dry before putting the divider inside.

I have my pencils by SU color family because this is how I am used to all my colors. I have a separate box for the rest of my colors. I really like having all my Magic Pencil materials in the same space. I can keep the whole box on a shelf and when I want to color with them, I just take the whole thing down and I'm ready to go, everything is right there together!

What a fun day!

I meet SO many new people online and very rarely get to actually meet them IRL (in real life) so when the opportunity comes around to get to meet my "friends" for real I jump! Seriously, I talk to these gals DAILY, it feels like we've known each other forever, but in all actuality, we've never met. That's the hardest part about online friendships. Usually we live SO far away from one another it's impossible to meet, but every now and then, I mean once in a blue moon, I get to meet one of them!


That happened just this past Saturday! I got to meet Sara (Sassyat30) from SCS!!!! Woo Hoo!!! She was down this way to help her sister paint her new house. What a nice sister, to drive 6 hours just to help her paint! Well it worked out great for us :) We got a chance to meet for lunch and do a 'little' shopping. The only thing I wish was that we'd had more time to spend together! When you've talked online for months a couple of hours for lunch and shopping just isn't enough!

Danita (another "online friend" turned real life friend, HI Danita!) and I met Sara at her sisters and then we went to lunch at a really neat place. It used to be the newspaper building years ago and they turned it into a really cute little restaurant. During lunch Sara mentioned something about wanting to buy some Fabriano note cards but not really wanting to get them online. So I said that any "good" art store should have them. Danita told us there was a good art store on campus, so after lunch we went! Sara got her notecards and Danita and I got a few more Prismacolor pencils for our collections! (I only need 17 more to have all the SU matches! LOL)Unfortunately after that it was time to take Sara back to her sisters, I mean she was really there to help paint, not to go gallivanting around with us LOL!

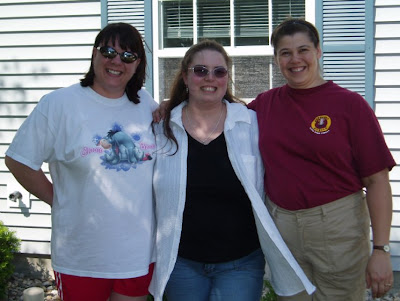
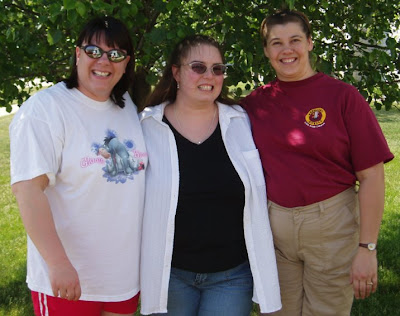
We had a great time! It was like old friends meeting again after a long time! There was never a lull in the conversation, heck it was hard to talk sometimes cuz we're all talkers LOL! We are definitely going to have to figure a way to get together again! Here's a couple pictures from our get together! Sara is on the left, I'm in the middle(I wish someone would have told me I was eating my hair!) LOL, and Danita is on the right!

"Cow" Tipping

I LOVE the movie Cars! And this tractor is just perfect for the "Cow" tipping part! Mater is hysterical!


The card is 4.25" x 4.25" in Really Rust stamped with Flannel Plaid in Really Rust then sponged with both Rust and Chocolate Chip. The strip is Old Olive with Linen stamped in Olive and then sponged too. I printed the quote using the SF-Heather font.

I stamped the tractor 3 times then masked it and did the grass and clouds. I just made a cloud template from a sticky note. The "hub caps" are silver snaps, attached using my Crop-o-dile (LOVE it!)

All in all a pretty simple card, but I just think it's hysterical!

In Colors 2007

OK so I kept seeing all the pics from SU cruise and honestly I wasn't too impressed with the new colors. They all looked dark and dingy to me. I knew most of that was the pictures themselves and had little to do with the actual colors, but I was disappointed. Well I just got a peek at the Preview catty and OMG they are gorgeous!


The only one I'm not 100% sure about is the River Rock, but I know once I see it used I'll like it. I think I like more of this years colors than last years. I seriously can't wait for the new catty to come out! It's always around this time of year I get antsy and NEED new stuff to play with! Hopefully there are TONS of wonderful new sets that I can get my hands on !

Hopefully sometime today, my lovely DH will get these new colors added to the SU Color Combo Site!

We're still deciding what to do with the current In Colors once they retire. So I guess I'll ask your opinion.

Basically here are the choices:
1. remove them once the new catty is current
2. leave them for the Fall/Winter catty period and then remove them
3. leave them forever, but "X" them out somehow to indicate they are no longer current
4.other ;) (cuz as we all know, you always need an other choice)

LMK what you guys think and we'll do what we can :) Please remember we cannot make everyone happy, but we'll try to go with the majority vote ;)

My Little Barbie doll!

Kendalyn just turned 4 years old, but she LOVES Barbie! She has most of the Barbie movies and is always asking to watch them! Usually it's Princess and the Pauper, but lately she's gotten into The Magic of the Rainbow. She just loves it! Anyway, she's always asking me to do her hair like the characters in the movies. Like I said, most of the time she wants to be Annaliese, but yesterday she wanted to be Alena and then today she said, "Do my hair like Sunburst!" Hmm ok Sunburst has 2 pigtails on the top of her head with 3 brads coming out and looping around. I can do that. LOL So here's Kendalyn with her Sunburst hairdo!


She's such a funny kid! I still can't believe she's 4 already! Where did the time go?

I'm on a roll!!!

That LSC challenge really got me going today! I made 2 more cards in very little time!

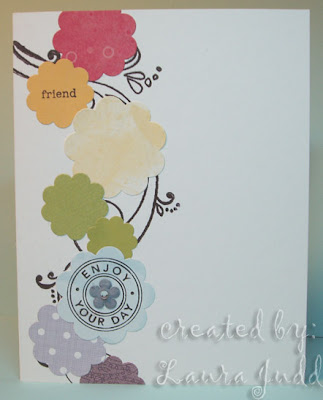
The first one is actually for the VSN Pre-challenge, but it fits the LSC challenge too :) The Pre-challenge was to use rainbows on your card. It could be literal or just the colors, bold or subtle, your choice. I just realized that today was the deadline for entries, so... here's my card! I think it took all of 20 minutes from start to finish!


First I stamped the white card base with the Rhonna Farrer flourishes stamps and then I adhered the flowers on top. The flowers are all cut with the Cuttlebug Flower die. I stamped the blue flower with the "Enjoy Your Day" stamp from Riveting, and attached a Prima and rhinestone :)All in all a really easy card to make.

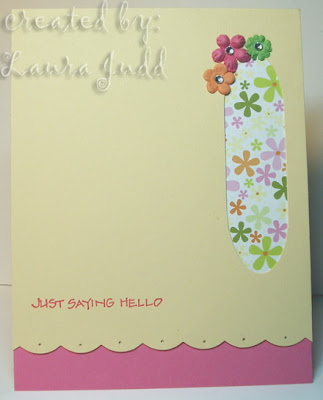
The next card was another for the LSC115 "Wide Open Spaces".


Again I saw something similar in one of my scramping mags. I punched out the oval with the SU large oval punch twice and then trimmed the edges to make one oval. Then I mounted the patterned paper to the back and cut the bottom edge with my scallop scissors. I used my new mat pack (LOVE it!) and poked the holes in the scallops. Then I backed the whole inside front with Regal Rose for a more finished look. I added the 3 mini Primas and rhinestones for some bling and poof! another simple card!

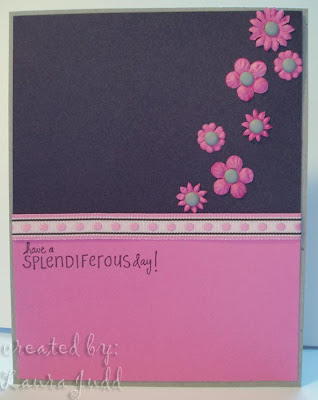
Have a Splendiferous Day

This is my absolute favorite saying from A*Muse!!! I think it's perfect! I LOVE A*Muse's sentiment stamps, I just wish I could afford more of them. I have a really hard time paying $7 for each stamp.

Today's challenge was Wide Open Spaces! We were to create a card that has lots of plain space on it. No patterned paper, no background stamps, no wheels, no nothing! I just got the latest CK mag today and I was flipping through it while I was eating lunch and I say Becky Higgin's sketch and sample LO. The right side of the sample LO was so simple and it was just perfect for this challenge. So what did I do? I CASE'd it of course ;)


This has to be the simplest card I have ever made! It's Kraft for the card base, Regal Rose on the bottom and Chocolate Chip on the top. I ran some ribbon across where the colors meet and then used a few (8 LOL) mini Prima flowers (LOVE them!) and Lasting Impressions matte brads (love them too!) in Oatmeal for the centers. Then the sentiment and I was done! SO simple, but I really like it! Simple is hard for me LOL I always want to add more and more and more! LOL

Snappy Birthday

This was for the Featured Stamper this week. I had made the card earlier and totally forgot to take a pic of it to post! Some days (weeks) my brain decides it doesn't want to work for me, I guess this is one of those weeks!

Here's the original card: GG's Frogs by themilesmum

As usual the challenge is to CASE a card and change at least 2 things about it. So, here's my take on her card :)


I changed the colors (but only slightly) actually I only changed 1 color! Amazing how changing 1 color changes the look of the entire card! I also used Crab & Co. from SU and the bubbles embossing folder for my Cuttlebug instead of the mosaic one. I really like the way this turned out!

The crab was colored with Prismacolors and Gamsol. I really love this coloring technique! I think I use it more than any other medium I have! It's just so easy to get great looking images!

New Look

So I decided it was time for a change. Whacha think? I thought I'd bring my chickie back from retirement! Isn't she cool?! She was a birthday present for me from the gals at scrapbooking forum I used to frequent. Unfortunately the gal that made her no longer makes them custom. You have to buy her kits now. I think I was one of the last ones to get a custom chick!

It's been a while since I played around with digi scrapping stuff. I actually used to design papers and such, but I gave that up for stamping :) I think it turned out pretty good, but I'd like your feedback.

Happiness Always

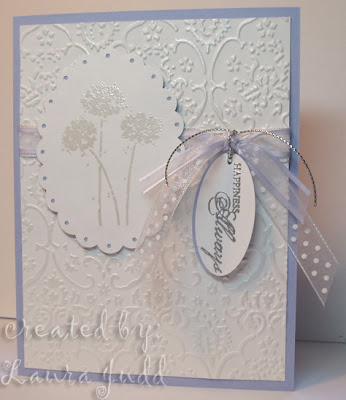
My physical therapist is getting married this weekend and I wanted to make a card for her :) Ok so I've only known her for 1 day, but she was really nice (even though she did torture me!) My problem was that I only know her first name! I don't know her fiancé’s name or her soon-to-be last name, so I was stuck :( I asked on SCS as to what to put on the envie and inside the card and as usual, I got some great advice! Now why my brain shut off and I couldn't think of what to write, I have no clue! LOL Anyway...


I LOVE how this turned out! I got the idea for the background from notimetostamp's card here: A Detailed Wedding I love all the little details she added to a fairly simple card to make it outstanding!

So I used the textile Cuttlebug folder and embossed it on white, then touched my Versamark pad to the raised parts and then brushed it with my Micro Pearl Pearl Ex. WOW! Instant beauty! Of course I forgot to seal it with hairspray, but I did that later and it shows no ill effects. LOL

The flowers are from SU's Happy Harmony set (LOVE that SAB set!!!) and they were stamped with Versamark and then I made a mixture of Micro Pearl Pearl Ex and clear embossing powder and embossed them with that :) It's SO purdy! Then I punch them out with the Giga Scalloped Oval punch and punched the holes with my 1/16th hole punch. I backed that with another scalloped oval in Almost Amethyst, just for a hint of color.

The sentiment is done in silver EP and punched out with my new SU oval punch (now I need the small one!) And I backed that with another oval in Almost Amethyst, but just slightly offset, so it almost looks like a shadow.

I have this Offray ribbon I found at Wal-Mart that matches Almost Amethyst perfectly! So I used it with the sheer white polka-dot ribbon and tied them around the embossed piece. Then I tied the Happiness Always onto the knot to finish the front.

I then went to search my verses file for the perfect sentiment for the inside of the card. When I found this one I couldn't believe how PERFECT it was for this card!

For the two of you,

May you always be warmed
by each other's smile.
Always take time to walk
and talk awhile
Always know deep down
you're each other's best friend
And enjoy the kind of love that
grows and knows no end.
Wishing you an "always"
kind of love!

Congratulations

I printed that on vellum and trimmed the vellum 1/4" or so smaller than the card. I used my new glue pen to run a thin line of glue down the crease and I put the vellum inset inside. I don't normally do this , but for wedding cards I think it adds a really elegant look! See? LOL


I really like how everything turned out! It's funny how you try really hard to make something beautiful for someone you've just met. I guess it has something to do with good first impressions.

Stay Cool


OK so this started out for the Limited Supply Challenge on SCS today. We were supposed to only use things from a list. Well I used 1 thing that wasn't one the list, so I guess I'm disqualified, but I still like my card :)

Here's the list:

Food stamps
Sentiments
Up to 2 backgrounds (stamps)
Hemp or fibers
Brads
Sponging, tearing, distressing
Faux stitching
Paper piercing
CS & Ink: Earth Elements and/or bold brights + neutrals

Ok so the shrimp might be pushing it a little bit as far as a "food" stamp, but I'll say it again, Shrimp are food (even if they have eyes ;) ) LOL Anywho... I stamped my shrimp on a transparency (this is my disqualifying move) and colored them with my Cameo Coral marker. Then I cut them out and ran them through my Xyron X, some facing one direction and some facing the other. It's a great technique for getting a reverse image.

The glass is doodled and if you look ever so closely, you can see "ice cubes" in the glass. I would have LOVED to have used my Crystal Effects to give them an icy shine, but that would have been an even bigger no no.

The background is still one of my favorite things to do with Print Pattern. I love making the little dots with my Signo gel pen. (I figured since faux stitching was on the list, technically the white gel pen was on the list too ;) ain't I a stinka'?)

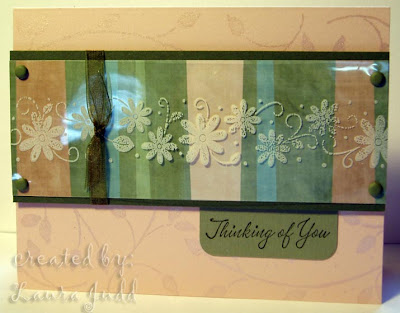
Clearly fun!


Today's Ways to Use it challenge was to use clear stuff on your cards. I chose a transparency. I saw this on a baby card by Ronie and thought it was such a neat idea. Here's her card: Ronie's Card

The Garden Annuals wheel is stamped in white Stazon onto the transparency. I stamped the Watercolor Vine wheel in Versamark and dusted it with Micro Pearl, Pearl Ex, it really shimmers IRL :) The picture doesn't do it justice, I tried to get the colors right, but the glare from the transparency was making Photo shop do wonky things!

Ok I was never a huge fan of anything that gets all messy (ie. PearlEx, Glitter etc...) But I remembered reading somewhere about using a swiffer duster cloth on your cards after you applied the Pearl Ex and OMG it works beautifully to remove the excess Pearl Ex from the card!! I was so happy! Now I can use all that Pearl Ex I was given :)

A&A Card Front Swap


I joined a swap, I don't usually, cuz I've been burned in the past. I put my heart into making really great cards and I tend to get back crap. I don't mean newbies best attempts, I mean out and out crap. But I decided to go for it this time because of the group of gals involved with this one :)

I won't go into the group, but we are like-minded individuals and the swap focus was to make cards we could send to our friends with the same ideals. Most will go a humorous route, but I chose a more serious direction.

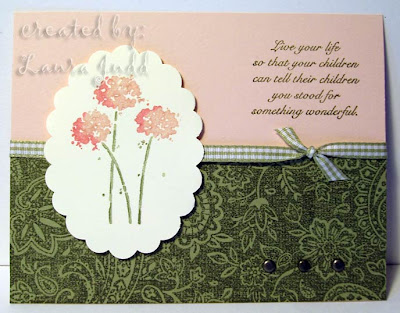
I found this stamp at Viva Las Vegas Stamps. I LOVE the sentiment: "Live your life so that your children can tell their children you stood for something wonderful." No matter your beliefs, I think this is good advice!

I made the card front just smaller than a normal card, so there's a border around the card front when mounted to the base. I would suggest a Mellow Moss or Vanilla base for this card :)

The flowers were colored with markers and then stamped on the oval pieces. I think next time I will stamp the images first and then punch out the images, as not all my flowers are in the middle of the oval. Not that anyone else will notice, but I do and it bugs me! LOL The bottom piece is Mellow Moss with Paisley stamped in Always Artichoke ink. Because this was a swap, I stamped the full 1/4 sheet and cut them in half. Mellow Moss Gingham ribbon and 2 antique brads complete the card front :) I really like how it turned out!
Welcome to my new an improved blog. I hope you can find something useful, insightful, humorous or just plain silly here. Enjoy!
 
Copyright 2009 Inky Dinky Doo All rights reserved.
Blogger Templates created by Deluxe Templates
Wordpress Theme by EZwpthemes