RSS

Stamp Cleaners - Which one?


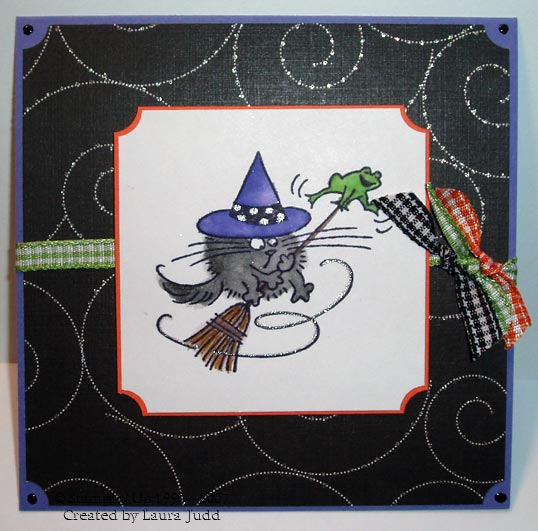
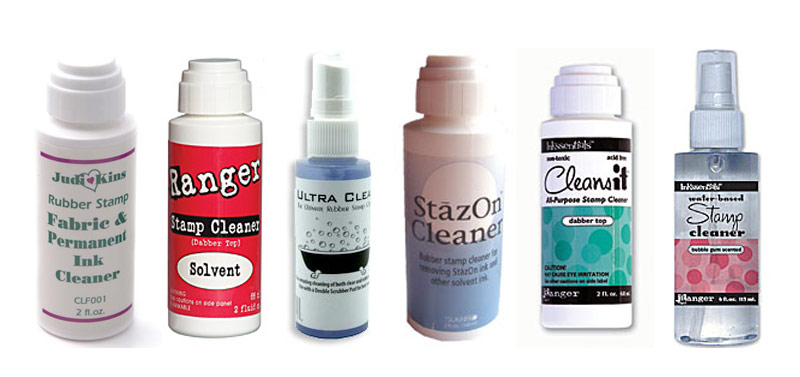
Well, there are SO many stamp cleaners on the market today, I thought I'd try a bunch of them out and let you all know the results. So far I have only tried the first 4, but I plan on getting the other 2 this weekend. I'll add my finding on those later. Now I'm judging these based on their ability to clean SU's Basic Black and Stazon ink off the stamps. For water based inks (like SU's Classic inks) I use my own homemade stamp cleaner! recipe to follow ;)

My favorite stamp cleaner by far is the 1st one. Judikins Fabric and Permanent Ink Cleaner! It stinks to high heaven, but it cleans even Stazon off my stamps with ease. Old and new stains alike, it doesn't really matter, it gets them all pretty well. I'm a fan of the dauber top, so that helps it's standing a little bit too. Unfortunately, it's a little difficult to find. My old lss carried it before they went out of business and I've used all I bought from there :( I did find a place to order the LARGE jug, but I haven't ordered any yet. Price about $3

My next favorite is the Ranger Solvent ink cleaner (red bottle). This one stinks too, but not as bad as the Judikins. This one will get the ink off your stamps if the stains are pretty fresh, for the older stains, it does ok. Again, the dauber top is nice, I think it helps you use only as much cleaner as you need. I just touch the dauber top to a paper towel to clean it off after each stamp. Price about $3.50 - $4

Now the one that SO many people rave about, Ultra Clean. While this cleaner doesn't stink the way the others do, and it does a nice job (not the best IMHO) of getting the ink off my stamps, I just don't like it. Why? I've found that it's oily. If I get this stuff on my hands while I'm cleaning a stamp, I have to stop and wash my hands before I touch my project again. I don't have time for that! I have ruined too many cards because of oily fingerprints because of this cleaner. It's also a spray, which is fine, I do use a spray bottle for my own cleaner, but for the price, I think you waste more than you use. Price about $5 - $6

Now StazOn Cleaner, it smells nice (like lemons) but honestly it didn't get the ink off my stamps very well. It's also VERY oily and I have to clean my stamps again with a regular cleaner to get the residue off of them. Personally I will not buy this one again. Price about $4

For the last 2, as I said before, I will get them this weekend and let you know what I think. I have heard good things about both, but I also heard fantastic things about Ultra Clean and it turns out I don't really care for it, so we'll see!

Ok for the regular stamp cleaner recipe:

1 gallon Distilled water (pour out about 1/2 cup or so)
4 - 6 TBS Glycerin (ask at the pharmacy counter for it)
and about 3 good squirts of Baby Wash (don't use too much or it gets too sudsy)

Mix this all in the Gallon jug the water comes in and don't forget to label it! I made a batch of this stuff over a year ago and I still have 2/3 of it left. I stamp everyday, so I use a lot! LOL I just put some in a cheap spritz bottle I got at Wal-Mart in the beauty section. Spritz it on my scrubber and away we go!

***I have been asked about Baby Wash. Basically it's just a very gentle soap. You can get a small bottle at the $1 Store if you don't have little ones around anymore. ***

Oh and a cheap alternative to the stamp scrubber SU sells ... paint pads. I can get 2 paint pads for just under $3 and then I can replace them when they get stained and nasty. I just clean them in the sink with regular soap and let them dry after each stamping marathon. Yes, they do "shed" a little bit, but only until they've been "broken in" for a few days. I bet I could take them to the sink when I first get them and scrub them until they don't "shed" anymore. I'll have to try that, it's about time for a new batch anyway!

Multi-fold Holiday Card

This was for today's sketch challenge on SCS. SC94 I used the vertical version so it would go with my Ornamassortment set! I love the way the card turned out, BUT I should have thought it all the way thru before putting it together.

I should have done the gold "stitches" before I put that layer on, because now it's just messy :( I like the way it "should" look LOL What happened was that I got it all done and the focal layer looked too plain to me. So I added the rhinestone to the center ornament, and that helped a little, but not enough. So instead of making a new card, I thought I could "fix" this one. UGH big mistake LOL. I'm too much a perfectionist to be happy with the stray EP flecks.

Ok enough complaining :) I do LOVE the way the Happy Holidays and the All in a Row turned out! I really think I'm going to like having All in a Row for adding little touches like this.

I'm going to need more Cranberry Crisp if I keep this up! I've been using it like crazy lately! Not that that's a bad thing *wink* It's a great color!

Ok, vent time. there's a new discussion on SCS about the "In Colors" and if you should get them, knowing that they'll only be around for a year. I think that if you like something, and can afford it, get it! Don't let the limited availability enter into your thoughts. If you go by that, then you won't buy ANY stamps because they "might" retire them at the end of the year. To me that's just silly. But then again I'm not a demo, just a happy customer who loves her stamps, CS and inks. I love the fact that SU is trying to keep up with the current color trends. So what if I can't get the CS after this year, I'll just have to make sure I buy enough to last me for a while *wink*.

Ornament Greetings

I was browsing blogs the other day, looking for inspiration for my Shoebox swap card, and I think I've found it!

I saw a card on Keri's (Sereikastamper) blog and knew I just had to try the sketch out! I love how it turned out! This is the card I'm going to use for my swap card.

There's only one detail to work out, do I buy the scented Embossing powder from CHF (The vanilla scented and colored one.) for the sentiment? Or do I leave it as-is with the Saffron craft ink?

OK the details :) The card base is Artichoke, and the Paisley background is stamped in Artichoke on Celery paper. The images are stamped on VV and then watercolored/colored with markers (the cranberry is done with a brush). The other colors are Cranberry Crisp and So Saffron. I added some stickles to the edges of the ornaments for some *bling* :)

I just got both these sets the other day, and I LOVE them! Paisley is going to quickly become one of my favorite backgrounds! I can see myself using it on everything!

Purple Cows Digital Photo Trimmer

I'm in love! This thing cuts thru paper like butta! It's wonderful (so far! *wink*)

I think it'll take a little getting used to, but so far I LOVE it! I got the smaller one, not the 2-in-1 version, I can't stand rotary trimmers :) This size is perfect for card makers. The measurements go up to 8 3/4 and just over 5 1/2. I would suggest the larger size if you intend to use it for scrapbooking.

Ok the things I LOVE about it:

The price! I got mine from HSN for $12.95 +s/h

The clean cuts it makes! It cut goes right thru the paper beautifully!


My big thing - there's a measurement for 5 1/2 right on the top! No more pulling out a long bar thingy that I have to make room for on my desk, and having the cut be off just because the paper had to go down to get to the measurement. KWIM?

No blades to replace! Woo Hoo!

The blade locks when not in use! Plus the blade is not sharp. It's a flat edge, so it's safe for kids to use too.

It's lightweight, and with the storage inside the clear part, it'll be nice for taking to crops and shoebox swaps!

Cons:

The little safety bar you have to push down before you cut. But this is the thing I think I'll just have to get used to.

I wish they'd have put the little hash marks on the underside of the clear plastic part. My Fiskars trimmer was so well loved that the hash marks wore away! I'm afraid this will eventually happen with this one as well.

***************************************************************************

To me the Pros certainly outweigh the Cons for this trimmer. As with all things new, there is a breaking period and the initial love affair, so I'll keep y'all posted as to if I still love my trimmer when it's not the new toy in my collection!

Coal Again?


OK I admit it, I LOVE Fluffles! BUT, I only really like the tongue-in-cheek ones! I saw this guy at the store and I had to have him!

I belong to a Yahoo group called Scrappin' Sailors. We scrap, we curse, we laugh, and we don't take life too seriously! It's a great group of ladies. We decided to do a non-religious Christmas card swap, so this is the card I'm doing! I think it's perfect for our little group of misfits! Everyone in it deserves at least one piece of coal this year *wink*

I also LOVE non-traditional colors for Christmas. My own tree/house gets decorated in Blue and Silver! So anyway, I used Lovely Lilac, Bashful Blue, & Certainly Celery for the stocking and ornaments, the tree branch is Always Artichoke and Fluffles is done with Creamy Caramel. I used my markers for all the coloring, except for Fluffles himself. I used the Aquapainter and watered down ink for him. It's hard to see in the scan, but I used my Glitter pen to add glitter to the ornaments, the centers of the "Twinkles" and the centers of the "star" stitches. It's really pretty IRL!

Ok another new find! Back in June, I had tried to get the CTMH Simple Stitches SOTM set, but my demo waited a bit to long to put in the order and it wouldn't go thru. (Long story, but I wasn't too happy with CTMH at that point!) Anyway, I still wanted a stitches set, but never really looked into them. I was at the lss the other day, with a full punch card. That meant I "had" to buy $30 worth of product and I'd get it for 50% off! Woo Hoo! Gotta love "deals" like that! So anyway I saw these stitches by Technique Tuesday, I grabbed them up! LOVE them! They're a little short, but since they're clear, it's pretty easy to line them up.

Scenic Fall

Have you ever had an idea for a card you wanted to make, and couldn't make it fast enough? That's what happened with this card! I saw a digi LO in the new Simple Scrapbooks that just caught my eye and I thought, "That would make an AWESOME card!" So off I went to my scramping table (stamping/scraping)to play!

I started with the PP this time. I don't usually, but I have had this Scenic Route paper for over a year now, and while I LOVE it, I just haven't used it. So it was first, then I looked thru my HUGE binder of WRAKs to find an image that would go nicely with the Fall colors on the paper. What better than Autumn leaves in a basket? Nothing! LOL SO that was next. Out came the trusty Prismacolor pencils and OMS, my favorite coloring medium.

I love the Linen on the background and on the PP, but I'm a little disappointed with myself for adding it to the focal image. See the leaves were stamped on WW paper and I had used VV for the rest of the card. SO the focal image needed some toning down. I sponged the edge ala SweetMissDaisy, but it wasn't 'quite' enough. Even with stamping off once, the linen turned out to be a bit too heavy, oh well.

I might re-visit this design when my Paisley stamp gets here. I think it would look fantastic!

The Secret to Happiness is ...

a good sale!

This is for the Ways to Use it Challenge on SCS for today. Glitter! It's really hard to see in the pic, but there is glitter on the gifts, on the words, around the main image, in some of the dots on the background and along the edges of the papers. It's kinda subtle, but it's there!

If you haven't noticed, my goal this week is to use stamps/sets that have been collecting dust. First I used the Wheelbarrow from The Wheel Thing, then the chair from A Little Love, and now the shopping cart from The Wheel Thing and the gifts from Cool Cat (this is actually why I bought Cool Cat! LOL)

Nothing too fancy about this one, Just a lot of the Sakura Glitter pen, LOVE that thing! Word Window punchies thanks to Sarah! I used the last of my fantabulous KI Memories paper :( I hope I can get some more from the lss. I just love the colors in this collection!

One thing to note, interesting things happen when you emboss over embossing! I had done the gifts first, and embossed them with my homemade Iridescent Ice EP. Then I stamped the cart with Versamark over top and embossed with Silver EP. The parts of the cart that went over the gifts are still silver, but it kinda blended into the existing EP.

Happy Together


My Aunt and Uncle will be celebrating their 50th wedding anniversary at the end of this month, so I needed an anniversary card. I'm not one for formal, so I didn't really want to do the traditional gold, plus that's not really them anyway :)

This was for the SC93 on SCS. I know I know, I had to be the one to do it horizontally, but I think it works. The silk flowers are from my stash! I have a TON of them and I hardly ever use them anymore. So I used 3 on this card ;)

So, what do you do when you want to add a brad and you already stuck down the layer that was supposed to hide the prongs? Ugh I hate when I work faster than my brain! I did just that on this card. I stuck down the Regal Rose layer before I added the flower. Grrr. So anyway, I punched a small hole in some Saffron paper and then punched a 1" circle out around the hole. Now I had a "base" to put the flower on and the brad prongs would be hidden :) You can't see the Saffron circle cuz it's hidden behind the flower :) Now this won't work for every time I screw up and forget that I wanted to add a brad, but it was a pretty good solution for this time!

The large scallops are done with the SU Slit punch. I just drew a straight line across the paper and lined up the straight edge of the punch along that line and punched. Then I moved down and lined up the edge of the round part to the last punch as well as the straight edge and punched again. Continue this until the whole piece is scalloped.

It's hard to see in the small picture, but the Chocolate Chip strip has the punched holes in it. I really love what it adds to the card!

Wheely Sparkly


This is for the CC83 color challenge on SCS. I started out with something totally different in mind when I started stamping, but you know how it goes sometimes, things just kinda evolve into the finished card as you work. That's exactly what happened here.

I was going to have 2 panels that slightly overlapped, but I didn't like it when I tried it out. Then I was going to use white brads for the flower centers, but when I was getting them out, I saw the Rhinestones and well, that was that! LOL The white edge was another after thought, then it got too heavy and I had to tone it down, so I stamped the whole thing with Linen. That helped a little, but I still needed to work the white around some more. UGH!

I really need to use my Primas more often! I have a TON, but I never think to add them to my cards. But when I do, I always like them.

SO glad I was able to trade for Warmest Regards! I LOVE this set! The font is so nice, kinda half formal/half casual. Plus FINALLY I have a sympathy sentiment. Not that look forward to using it, but it's nice to know I have one if I need it.

A Fairy Get Well Wish


Ink it Up's DD is having surgery tomorrow, and Keri asked the WRAK'ers to flood her DD with get well cards. She said Addie loves anything sparkly, I think I got that part down pretty well! *wink*

I got the fairy as a WRAK and I thought it would be perfect for a Get Well "Wish" :) She is colored using a paintbrush and ink. Then I added some Stickles all over the background as well as on her dress. The wand is a little adhesive backed rhinestone I found at Hobby Lobby. She's popped up with mounting tape. I've found I like mounting tape better than pop dots for these larger areas. The small pop dots don't give enough support to the piece and then it ends up sagging once it's gotten to it's destination, not good!

The background is stamped with Gable Green craft ink and then I used homemade Iridescent Ice EP to add LOTS of sparkle! I stamped the Pixie Pink strip with the star stamp from Background Basics and also used my II EP :) I love the poked strip that atomicbutterfly uses, and I thought I'd give it a try here :) I think I like it! Although I had to weigh down the CS layers so the glue could cure. It kept popping up and wouldn't stay stuck! Out came the big ole' binder and let dry for a couple of hours, now it's stuck! LOL

Frankie Goes Trick or Treating!


I LOVE this guy! Actually I love all Halloween stamps! But this guy just makes me laugh, with his belly sticking out and his "I love Bats!" shirt, I just can't help but giggle when I see him!

So I was talking to Anna (SweetMissDaisy) last night, and we were discussing the Shimmer paper. I admitted that I had never used the few sheets I have (I don't want to mess up since I only have a few sheets :( ) and she told me that I had better get busy and try them out! LOL So figuring it was National Card Making Day, AND Anna's birthday, so I had better listen and make a card! LOL

I stamped Frankie on the Shimmer paper with Stazon (my pad is getting dry, so he kinda looks grayish instead of black :( ) Then I colored him with Prismacolor pencils and used the Magic Pencil technique, Gamsol or Odorless Mineral spirits are used with stumps, to blend the colors. I love this technique for coloring and I really need to invest in a larger set of pencils, but that's another blog entry! LOL

I stamped the Linograph in Old Olive on WW and then using my Elegant Eggplant marker, I colored in the little "flower petals". Then I dotted the centers with the Signo white gel pen.

The bat was an after thought, I wish I had thought about adding him earlier. I would have stamped him on the Shimmer paper too and then just cut out the top of the wings, rather than cutting him out all the way and having to lost some detail, because I can't cut that small! Oh well, something to remember for the next time :D

Basic Grey Chipboard Mini Monos


I just picked up a pack of these for a project I was working and I didn't realize that they were self-adhesive. So I'm thinking, "I'll give it a try, but I'll prolly need to use glue dots or red liner tape to really get them to stick." I have never had luck with anything self-adhesive. So I altered the letters for my project and stuck them down. Well I messed up the one and had to move it just slightly, so I tried to pull it up to move it over. First off, it wouldn't budge! Then when I finally got an edge up, it split in 2 LOL! So needless to say, these things REALLY stay stuck! I was able to fix my boo-boo, and the project looks great!

For the price, I'm really happy with these! They were under $6 and there are 81 pieces! Nope, I'm not getting paid to blog about this, just really happy with a purchase I made :) I wish all my impulse purchases ended up this good LOL!

I'd post the project, but the person it's for reads my blog, and I don't want her to see it until she gets it ;) So ya'll will have to wait too! Hehehe!

Fluffles!

I did it, I jumped onto the Fluffles bandwagon! So many people were doing SUCH cute things with these guys, I had to try them for myself. SO I asked for Fluffles images on the Wish RAK group. I got a ton of everyday and some Christmas ones, but I didn't get either of these guys. So what did I do?? I went out and bought them for myself ;)LOL

Now I'm not one to send Thanksgiving cards, but I was laughing SO hard when I first saw this stamp, that I knew I just HAD to make a card with it! My step-MIL has like 7 cats, so I think she may get this card, just cuz she can relate! LOL

I had seen some other people doing up the Linograph stamp this way, with the Signo gel pen and the stickles, and I just fell in love with the look! I think it adds SO much to the card.

The scallop oval is of course the Giga punch from Marvy, but the larger plain oval was cut with the CM cutting system! I was so excited to find that the proportions of the CM ovals fit the punches perfectly! I have no idea why Marvy didn't think of that when they designed their solid punches, but it bugged the heck out of me that they were not "just right". So now, I'm a happy camper and can have solid ovals to fit my scalloped punches :)

This card was so easy to do! Fluffles is colored with markers (except Fluffles himself, he's done with watercolor crayons)I used my new Sakura Stardust pen to add glitter to the hat and the swirl under the broom. I also dotted the Chatterbox paper with the Stardust pen to give it more sparkle! I'm not sure why I waited so long to pick up one of these pens! It's so easy to add just a touch of glitz to any card! The little black dots in the corners are done with the Sakura Glaze pen. Another little gem of a pen!

Another new favorite supply of mine has to be the ticker corner punch from SU! Yes you can use a circle punch and carefully look where you're punching to get the same look, but it's SO much easier with the SU punch. Just another little thing that adds SO much to a card!

The field, the field, the field is on FIRE!

Yesterday after Rob took Ronon out for a walk he was just hanging out outside enjoying the beautiful weather. I went out to join him and I sat down on the porch, when I looked up and noticed that the field behind our shed was on fire. Casually I said to Rob, "Oh it looks like they're burning the field." We didn't really think too much of it, other than it was a bit windy for burning.


Then we looked closer and noticed that our neighbor was burning in his backyard, just west of the field that was on fire. We also saw the field was burning from the middle of a side, not the edge like they usually do when it's a controlled burn. Hmmm this seemed a bit odd. Just then the neighbor gets on his tractor and drives out into the field and drives around the fire. Ok now this is really strange, what the heck is going on?


Well the next sound answered my question LOL Fire Engines! Here comes the Waynesville Volunteer Fire Dept to put out the fire. My guess is that something from the neighbors burn pile blew into the field and caught it on fire. Luckily the farmers had taken the corn down just this past week! If it hadn't been down, I don't think I want to know what might have happened! It would have been WAY to close for comfort! Even thought there's a stream in-between our property and where the fire was, I still would have been very worried!


In about 10 - 15 minutes the fire spread across most of the field! It's a good thing we have a volunteer fire department here in town! Their response time was really good! Now the fact that there are only 500 people or so in the town and it's a total of 6 blocks tall by 5 blocks wide, should mean for a good response time! But it was still good to see them act so fast and prevent the fire from getting out of hand!

Our New Puppy

We got a new puppy! His name is Ronon, after the Stargate Atlantis character Ronon Dex :) We're HUGE Stargate fans and it just seemed like a good name for a large male dog ;)

Ronon is part Australian Shepard, Sheltie, Australian Cattle Dog and part Lab. Lots of parts to make up one cute puppy! He's adjusting very well to our home, and is eager to please! We've only had him for a few days, but so far he is understanding that the crate is his place, he is to only go potty outside and he even sits (well most of the time;) )

We had an Australian Cattle Dog mix before and she was the best dog! Unfortunately, she had an accident last year and broke her neck. We had to have her put to sleep :( It was very hard on all of us. So after a year of healing, we decided we were ready to get another dog and wanted another Aussie Cattle dog mix :)

Luck was on our side :) I get the Freecycle mailings for this area and a lady was giving away these pups! I IM'd Rob and we decided to ask for pictures. By the time we had responded, there was only one pup left, but he was PERFECT! We fell in love with him, just from the picture! We talked about it again, and decided that we were ready for another dog and this little guy would be ours!


We picked him up last Thursday and after a trip to PetCo for the essentials, we brought him home. Upon arriving home our cat, Maki, proceeded to let us know exactly how she felt about this intruder, by swiping at him and scratching him in the face! She was NOT happy LOL! He was fine and more than a little wary of the cat for the rest of the day.

He slept thru the night the very first night! I think it was more out of exhaustion than anything else. So far we've only had a few accidents in the house, all our fault. We just didn't get him out in time. It's almost like having a newborn again! We are up in the middle of the night, taking him outside to go potty, stopping him from getting into everything, cleaning up messes. LOL But it's all worth it when he gives his sweet kisses!
Welcome to my new an improved blog. I hope you can find something useful, insightful, humorous or just plain silly here. Enjoy!
 
Copyright 2009 Inky Dinky Doo All rights reserved.
Blogger Templates created by Deluxe Templates
Wordpress Theme by EZwpthemes