RSS
Showing posts with label products. Show all posts

Going Places - Meadow Road

Another one in my Going Places series for my parents! This time I used my brand new Stampscapes stamp. (I could really get into those!!!) Since I'm not a millionaire, I only bought 1 (man they get pricey!)

This place, isn't really representative of anywhere special, I just thought it was pretty!


So you want details huh? Here ya go ...

The Stampscapes stamp was stamped in Basic Black (stamped off once) twice right next to each other, (can YOU see the seam??? ;) ) LOL I can, but only because I know where to look! Then I colored it with my SU markers and I sponged the color on the grass and sky. (Oh btw: ripped paper towels make GREAT could templates!) I must have used every green SU makes to do the grass part, but I think it has a lot of depth. All the tree trunks are Chocolate Chip and the main trees are in Artichoke. Since the RV was WAY out of proportion, I needed a way to make it smaller. The gal at the stamp store yesterday suggested I stamp it on shrink plastic. Hmm ok, that's a thought!

So I stamped it on white shrink plastic and colored it (carefully) with Copic, Sharpies and SU markers. I say carefully, because the Copic will make the Stazon bleed and the SU will smear if you touch it before you shrink the plastic, once it's shrunk, it's ok :)

After I shrank the RV with heat gun, I ran it through my Xyron X, but I decided I wanted more holding power than the X could give me, so I put a strip of red liner tape on the back. Now that sucker is good and stuck!

The trickiest part was on the card itself. After I trimmed the focal piece and mounted it on Not Quite Navy CS, I wanted a simple yet effective way to display it on the card. I didn't want to distract from the focal piece (since I spent all morning making it LOL!). So I decided to stamp the Stampscapes image in Sahara Sand on the Sahara Sand card. Great idea, simple right?

WRONG! I had trimmed part of the focal piece before I mounted it, so it wasn't like I could just stamp the Stampscapes stamp and be done with it, nope, I had to stamp it on my imaging sheet for my Lego-ma-jig, then line it up with the focal piece BEFORE I adhered the focal piece, then remove the focal piece without disturbing the Lego-ma-jig, then stamp the Stampscapes stamp. And then do it all over again for the other side!!! Whew! But I LOVE the results!!!

Stamps: RV - Copper Leaf Creations, Stampscapes - Meadow Lg, Sentiment - Inky Antics
Paper: WW, Not Quite Navy, Sahara Sand
Ink: Always Artichoke, Old Olive, Going Gray, Bashful Blue, Not Quite Navy, Night of Navy, Bordering Blue, Garden Green, Chocolate chip, So Saffron
Accessories - SU Markers, Copic Markers, Sharpies, Micron pen,

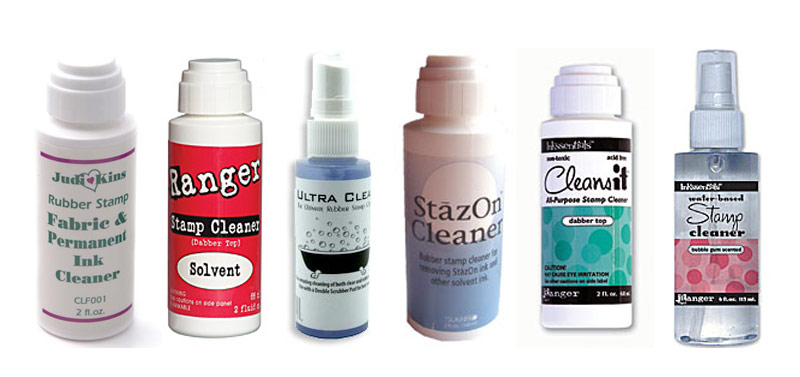
Stamp Cleaners - Which one?


Well, there are SO many stamp cleaners on the market today, I thought I'd try a bunch of them out and let you all know the results. So far I have only tried the first 4, but I plan on getting the other 2 this weekend. I'll add my finding on those later. Now I'm judging these based on their ability to clean SU's Basic Black and Stazon ink off the stamps. For water based inks (like SU's Classic inks) I use my own homemade stamp cleaner! recipe to follow ;)

My favorite stamp cleaner by far is the 1st one. Judikins Fabric and Permanent Ink Cleaner! It stinks to high heaven, but it cleans even Stazon off my stamps with ease. Old and new stains alike, it doesn't really matter, it gets them all pretty well. I'm a fan of the dauber top, so that helps it's standing a little bit too. Unfortunately, it's a little difficult to find. My old lss carried it before they went out of business and I've used all I bought from there :( I did find a place to order the LARGE jug, but I haven't ordered any yet. Price about $3

My next favorite is the Ranger Solvent ink cleaner (red bottle). This one stinks too, but not as bad as the Judikins. This one will get the ink off your stamps if the stains are pretty fresh, for the older stains, it does ok. Again, the dauber top is nice, I think it helps you use only as much cleaner as you need. I just touch the dauber top to a paper towel to clean it off after each stamp. Price about $3.50 - $4

Now the one that SO many people rave about, Ultra Clean. While this cleaner doesn't stink the way the others do, and it does a nice job (not the best IMHO) of getting the ink off my stamps, I just don't like it. Why? I've found that it's oily. If I get this stuff on my hands while I'm cleaning a stamp, I have to stop and wash my hands before I touch my project again. I don't have time for that! I have ruined too many cards because of oily fingerprints because of this cleaner. It's also a spray, which is fine, I do use a spray bottle for my own cleaner, but for the price, I think you waste more than you use. Price about $5 - $6

Now StazOn Cleaner, it smells nice (like lemons) but honestly it didn't get the ink off my stamps very well. It's also VERY oily and I have to clean my stamps again with a regular cleaner to get the residue off of them. Personally I will not buy this one again. Price about $4

For the last 2, as I said before, I will get them this weekend and let you know what I think. I have heard good things about both, but I also heard fantastic things about Ultra Clean and it turns out I don't really care for it, so we'll see!

Ok for the regular stamp cleaner recipe:

1 gallon Distilled water (pour out about 1/2 cup or so)
4 - 6 TBS Glycerin (ask at the pharmacy counter for it)
and about 3 good squirts of Baby Wash (don't use too much or it gets too sudsy)

Mix this all in the Gallon jug the water comes in and don't forget to label it! I made a batch of this stuff over a year ago and I still have 2/3 of it left. I stamp everyday, so I use a lot! LOL I just put some in a cheap spritz bottle I got at Wal-Mart in the beauty section. Spritz it on my scrubber and away we go!

***I have been asked about Baby Wash. Basically it's just a very gentle soap. You can get a small bottle at the $1 Store if you don't have little ones around anymore. ***

Oh and a cheap alternative to the stamp scrubber SU sells ... paint pads. I can get 2 paint pads for just under $3 and then I can replace them when they get stained and nasty. I just clean them in the sink with regular soap and let them dry after each stamping marathon. Yes, they do "shed" a little bit, but only until they've been "broken in" for a few days. I bet I could take them to the sink when I first get them and scrub them until they don't "shed" anymore. I'll have to try that, it's about time for a new batch anyway!

Purple Cows Digital Photo Trimmer

I'm in love! This thing cuts thru paper like butta! It's wonderful (so far! *wink*)

I think it'll take a little getting used to, but so far I LOVE it! I got the smaller one, not the 2-in-1 version, I can't stand rotary trimmers :) This size is perfect for card makers. The measurements go up to 8 3/4 and just over 5 1/2. I would suggest the larger size if you intend to use it for scrapbooking.

Ok the things I LOVE about it:

The price! I got mine from HSN for $12.95 +s/h

The clean cuts it makes! It cut goes right thru the paper beautifully!


My big thing - there's a measurement for 5 1/2 right on the top! No more pulling out a long bar thingy that I have to make room for on my desk, and having the cut be off just because the paper had to go down to get to the measurement. KWIM?

No blades to replace! Woo Hoo!

The blade locks when not in use! Plus the blade is not sharp. It's a flat edge, so it's safe for kids to use too.

It's lightweight, and with the storage inside the clear part, it'll be nice for taking to crops and shoebox swaps!

Cons:

The little safety bar you have to push down before you cut. But this is the thing I think I'll just have to get used to.

I wish they'd have put the little hash marks on the underside of the clear plastic part. My Fiskars trimmer was so well loved that the hash marks wore away! I'm afraid this will eventually happen with this one as well.

***************************************************************************

To me the Pros certainly outweigh the Cons for this trimmer. As with all things new, there is a breaking period and the initial love affair, so I'll keep y'all posted as to if I still love my trimmer when it's not the new toy in my collection!

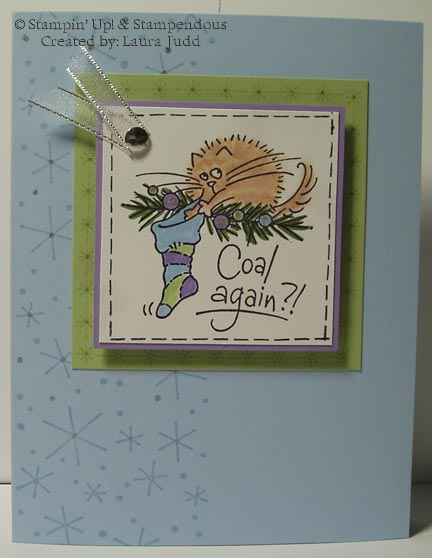
Coal Again?


OK I admit it, I LOVE Fluffles! BUT, I only really like the tongue-in-cheek ones! I saw this guy at the store and I had to have him!

I belong to a Yahoo group called Scrappin' Sailors. We scrap, we curse, we laugh, and we don't take life too seriously! It's a great group of ladies. We decided to do a non-religious Christmas card swap, so this is the card I'm doing! I think it's perfect for our little group of misfits! Everyone in it deserves at least one piece of coal this year *wink*

I also LOVE non-traditional colors for Christmas. My own tree/house gets decorated in Blue and Silver! So anyway, I used Lovely Lilac, Bashful Blue, & Certainly Celery for the stocking and ornaments, the tree branch is Always Artichoke and Fluffles is done with Creamy Caramel. I used my markers for all the coloring, except for Fluffles himself. I used the Aquapainter and watered down ink for him. It's hard to see in the scan, but I used my Glitter pen to add glitter to the ornaments, the centers of the "Twinkles" and the centers of the "star" stitches. It's really pretty IRL!

Ok another new find! Back in June, I had tried to get the CTMH Simple Stitches SOTM set, but my demo waited a bit to long to put in the order and it wouldn't go thru. (Long story, but I wasn't too happy with CTMH at that point!) Anyway, I still wanted a stitches set, but never really looked into them. I was at the lss the other day, with a full punch card. That meant I "had" to buy $30 worth of product and I'd get it for 50% off! Woo Hoo! Gotta love "deals" like that! So anyway I saw these stitches by Technique Tuesday, I grabbed them up! LOVE them! They're a little short, but since they're clear, it's pretty easy to line them up.

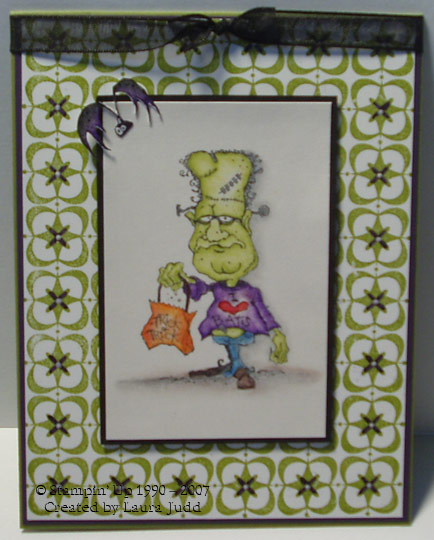
Frankie Goes Trick or Treating!


I LOVE this guy! Actually I love all Halloween stamps! But this guy just makes me laugh, with his belly sticking out and his "I love Bats!" shirt, I just can't help but giggle when I see him!

So I was talking to Anna (SweetMissDaisy) last night, and we were discussing the Shimmer paper. I admitted that I had never used the few sheets I have (I don't want to mess up since I only have a few sheets :( ) and she told me that I had better get busy and try them out! LOL So figuring it was National Card Making Day, AND Anna's birthday, so I had better listen and make a card! LOL

I stamped Frankie on the Shimmer paper with Stazon (my pad is getting dry, so he kinda looks grayish instead of black :( ) Then I colored him with Prismacolor pencils and used the Magic Pencil technique, Gamsol or Odorless Mineral spirits are used with stumps, to blend the colors. I love this technique for coloring and I really need to invest in a larger set of pencils, but that's another blog entry! LOL

I stamped the Linograph in Old Olive on WW and then using my Elegant Eggplant marker, I colored in the little "flower petals". Then I dotted the centers with the Signo white gel pen.

The bat was an after thought, I wish I had thought about adding him earlier. I would have stamped him on the Shimmer paper too and then just cut out the top of the wings, rather than cutting him out all the way and having to lost some detail, because I can't cut that small! Oh well, something to remember for the next time :D

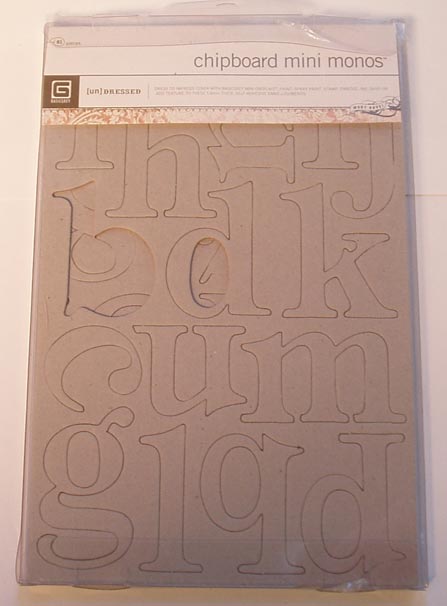
Basic Grey Chipboard Mini Monos


I just picked up a pack of these for a project I was working and I didn't realize that they were self-adhesive. So I'm thinking, "I'll give it a try, but I'll prolly need to use glue dots or red liner tape to really get them to stick." I have never had luck with anything self-adhesive. So I altered the letters for my project and stuck them down. Well I messed up the one and had to move it just slightly, so I tried to pull it up to move it over. First off, it wouldn't budge! Then when I finally got an edge up, it split in 2 LOL! So needless to say, these things REALLY stay stuck! I was able to fix my boo-boo, and the project looks great!

For the price, I'm really happy with these! They were under $6 and there are 81 pieces! Nope, I'm not getting paid to blog about this, just really happy with a purchase I made :) I wish all my impulse purchases ended up this good LOL!

I'd post the project, but the person it's for reads my blog, and I don't want her to see it until she gets it ;) So ya'll will have to wait too! Hehehe!
Welcome to my new an improved blog. I hope you can find something useful, insightful, humorous or just plain silly here. Enjoy!
 
Copyright 2009 Inky Dinky Doo All rights reserved.
Blogger Templates created by Deluxe Templates
Wordpress Theme by EZwpthemes