RSS
Showing posts with label tutorial. Show all posts

Coaster Box Prismacolor Pencil holder

So I'm in the middle of trying to get my stamping space organized and I decided I needed a better way to hold my Prismacolors and such, so I came up with this cute little box!


The basic box is the same as you've seen in a gazillion galleries and blogs, but the center divider and Gamsol holder are mine :)

You need:
8 4" medium weight coasters
15 4" squares of PP
small corner rounder
Modge Podge (I like the Matte)
a large-ish paint brush
sanding block
20 4" - 5" lengths of ribbon
good scissors or kraft knife (I used my Kai's and they worked great!)
a ruler, a centering ruler is nice if you have one
a hole punch (I used my Crop-a-dile)
good strong glue (I used Glossy Effects, basically CE)
2 6" lengths of 1/4" elastic

First thing you want to do is use the corner rounder and round the corners of your PP. Then adhere them to the coasters using the Modge Podge. I like to use a fairly thick layer so it stays wet and if I mess up the placement of the PP, I can move it around a tiny bit. Then I put a piece of CLEAN copy over the top and rub so there are no bubbles. I also use my brayer to make sure the PP is down really well. Do this to both sides of 7 of the coasters and 1 side of the last one, this is the bottom of the box.

Let these dry. I like to weigh them down while they are drying so they stay flat. If you don't, they will warp slightly and that just doesn't look as good. Once they are dry, decide which 4 will be the sides and which 3 will be the center divider pieces. Sand down the edges and corners for a shabby-chic look.

Using the templates as guides (these are NOT to scale, please go by the measurements!) make the 4 side pieces. You need 5 holes in each side. I used my Mat Pack to get them even on mine. Punch out holes with hole punch or Crop-o-dile.


Again using the templates as guides, make the 3 center divider pieces. I used my Kai scissors to cut the slits and they worked perfectly! You want to make the slits the width of the coaster, maybe "slightly" thicker. And only go down about 2 inches. These slide onto each other creating the 6 spaces for the pencils, stumps and sharpener to go in.


Now you want to make the box. If you are adding the holder for the gamsol, take the elastic and poke one piece through the 2nd and one piece through the 4th holes down and tie a knot in the back. Run them across the front and poke it through the same holes on the other side, pull taut and tie another knot. You want the knots to be on the inside and the elastic to have a little bit of give, but slack enough so that you can fit the Gamsol bottle in. Now you can construct the box. It's pretty self explanatory. For the bottom, I take the last coaster, the one with one one side covered with PP and kinda force it into the bottom, PP side up. Then I run a bead of CE around the seams. Let dry before putting the divider inside.

I have my pencils by SU color family because this is how I am used to all my colors. I have a separate box for the rest of my colors. I really like having all my Magic Pencil materials in the same space. I can keep the whole box on a shelf and when I want to color with them, I just take the whole thing down and I'm ready to go, everything is right there together!

Masking Tutorial

Well I got SO many comments on my VSN pre-challenge card about my masking, I thought I'd do a tutorial about it!

Masking is a great technique for creating scenes on your cards. The basic idea is to stamp the front images first and then move your way backwards, by masking off the front images. It doesn't take a lot of time, but you do have to be careful when creating your mask.

Here's what you need: Stamp-a-ma-jig (Lego-ma-jig in my case ;) ),imaging sheet, stamps, post it notes, micro-tip scissors, ink and paper.


First stamp your images on the post it notes, making sure you stamp them over the sticky edge.


Cut out your masks, being careful to cut right on the line or even slightly inside it. This is THE most important step to successful masking. If you cut out the image and leave a space outside of the line, you will have a "halo" around your image.

(Note: I only had to make sure the top of the cow was cut out, because that was the only part that needed to be covered.)


Now stamp your images on the imaging sheets.


Start stamping the images you want in the very front of the focal piece. I used the Lego-ma-jig to help me get them straight.


Once you have the whole front row finished then put the masks in place.


Using your stamp-a-ma-jig line up the first image in your second row (or the next one back in your picture).


I only made 3 masks of the cow, so I needed to move them as I worked my way across.


Once you have all you images in place, remove your masks. Some people save them by putting them on top of the sticker on the back of the wood block. Personally I don't think it takes too long to cut them out, so I don't save mine.


Color your image!


Finish your card! I made another version of my pre-VSN card. I think the "waldo" is a little trickier to find in this one than the last one, but it's still very easy to find!


*** I got a question about my imaging sheet, so I thought I'd answer it here :) I am the Queen of "if something works that's cheaper than the "normal" item, use that instead" Hence the Lego-ma-jig. The imaging sheet is actually the plastic backing that came with a set of Rusty Pickle alphabet stamps I bought (on clearance of course *wink*). It's big enough for almost all my stamps, so I saw no need to buy a "real" imaging sheet. LOL ***

Unmounting your Wheels - tutorial

Ok I admit it, I'm wheel challenged! I can't use them to save my life! Everytime I tried the image was either not fully stamped or it had lines from the edges of the rubber, it was frustrating. I ended up wasting more CS trying to get it right. I don't make wrapping paper or anything that I'd actually *need* a wheel, so one day I got the brilliant idea to unmount them. I'm pretty sure it wasn't my original idea, but it works for me!


Here's what I do:

1. Find the seam in the rubber. On most wheels it's pretty obvious.(pic 1) Take a sharp craft knife (or paper snips) and score through the glue on the seam. It should cut through pretty easily. (pic 2)


2. Carefully peel back one corner of the rubber at the seam. It should come right off. (pic 3)

3. Snip through the remaining rubber on the seam.


4. Pull the rubber off the wheel. Ususally the adhesive remains on the wheel and the rubber comes off clean. But sometimes some sticky is left. (pic 4)


5. If there is sticky left, just rub it in one direction until it all comes off. (pics 5 & 6)


6. Sometimes I trim the rubber first before mounting it to the EZ Mount (Smart Mount from CHF)It helps to get it trimmed nicely. (pic 7)


7. Mount rubber on EZ Mount foam carefully, making sure to keep it straight. (pic 8)


8. Use Baby Powder to coat the sticky if there is any left.(pics 9 & 10)


9. Trim the EZ Mount around the rubber making sure not to undercut the foam.


10. Clean your newly mounted wheel stamp!


11. Now mount your newly unmounted wheel on the storage system of your choice. I use the binder sheets from Sunday International. They also have an acrylic block 2" x 7" that's perfect for the jumbo wheels! (pics 11 & 12)

Now you can use your wheel just like a long stamp! You can have your wheels and use them too!

Glitter Ornament Tutorial


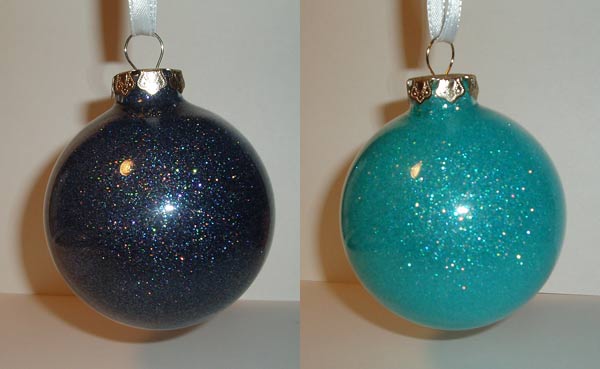
Ok here goes, my very first tutorial. I've never written one of these before, but I had so much fun making these ornaments, that I thought everyone should know how! The 1st one is Night of Navy and the 2nd one is Cool Caribbean. I also made one with Marigold Morning, but the picture made it look orange and not very pretty, but it's gorgeous IRL!


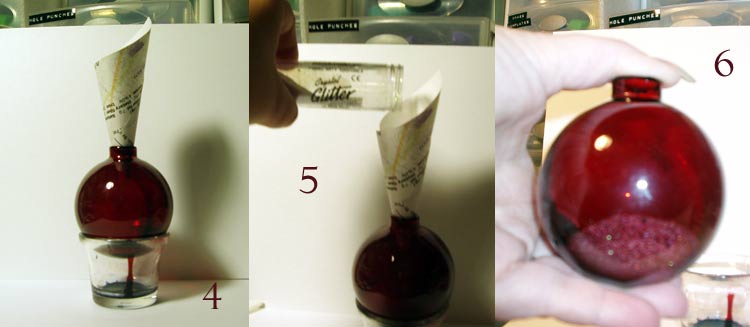
First carefully take the metal hanger off your ornament. Then add about 20 drops of reinker. I used Cranberry Crisp for this tutorial. (see pic 1) Then you need to swirl the ink around inside the ornament until it coats the inside completely. (see pic 2) After you have the entire inside coated, turn the ornament upside down so that it can drain into something. I can't tell you how long to do this as it depends on lots of factors, how humid it is, how many drops of reinker you used etc... Just let them drain until there are no more "drips" when you turn it over. (see pic 3)


Ok now you need to use some sort of funnel to add the glitter. I just made one from scrap copy paper. (see pic 4) Add about 1 1/2 teaspoon of ultra fine glitter to the ornament. (see pic 5) Now here comes the fun part! Take your thumb and COMPLETELY cover the opening. (I have tiny hands and I can do this, so you should be able to as well.) (see pic 6) Now SHAKE the ornament. Shake it hard, but be careful not to hit it on anything. You want to shake it and not roll the glitter around inside, rolling it will create lines in the glitter, while shaking it will give a smoother look.


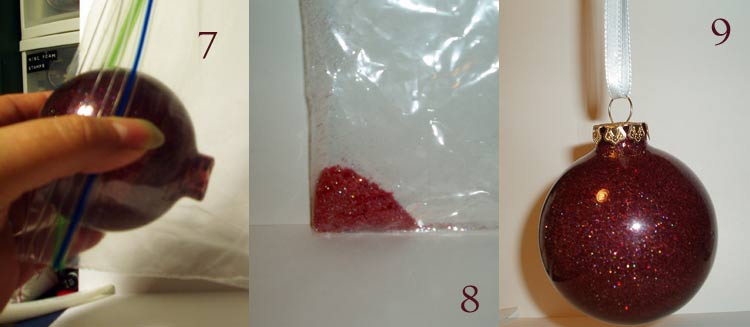
Now you want to have a plastic baggie ready to catch the excess glitter. This is the bonus of this technique. You now have custom colored glitter you can use on other projects! (see pics 7 & 8) Let the ornament dry for a few minutes and replace the metal hanger. Your custom glitter ornament is done! These are so much fun and SO easy to make!
Welcome to my new an improved blog. I hope you can find something useful, insightful, humorous or just plain silly here. Enjoy!
 
Copyright 2009 Inky Dinky Doo All rights reserved.
Blogger Templates created by Deluxe Templates
Wordpress Theme by EZwpthemes