RSS

Our Sunday Drive


Yesterday we decided to do some last minute Christmas shopping (I think I'm done now ;) )and then afterwards go for a drive to see the new Wind Farm that's being built here in Central Illinois. The Twin Groves Wind Farm will be one of the largest wind farms in the nation! When completed it will have 267 turbines producing enough power for 120,000 homes. That's a lot of wind power! These things are massive, the blades are 130 feet long! It's really hard to get the proper perspective looking at these pictures, but if you look at the picture of the truck, that's only 1 section! There are 3 sections and then the top portion that holds the blades.

While I think that using a renewable resource as wind is a wonderful thing, I'm glad I don't have to look at these everyday. I know that sounds strange considering we're getting a cell tower on our property. I can't explain it, the cell tower seems less imposing as these turbines. Anyway, I thought you might enjoy some of the pictures we took yesterday.

Here's one section on the special semi truck they use to transport them from the railroad to the site. It's just amazing too see. They had to construct special turning lanes on the roads because these trucks cannot make a 90 degree turn like normal trucks can!

Here's the crane adding a section to one of the turbines. If you look VERY closely you can see a normal pickup truck in front of the section still on the ground. That gives you a sense of how HUGE these things are!

These are the special carriers they had to build to transport the blades. Rob saw some blades coming into Bloomington on the train the other day. It took him almost 5 minutes to realize what exactly he was looking at!

Just another viwe of a partially completed turbine. Phase 1 of the construction should be completed by April 2007.

Here's a view of just a few of the completed windmills! In one picture we took you could count over 19 windmills!

Me & My Hip

Sorry I've been MIA for the past couple weeks! Things are just hectic around here between Christmas and the ongoing saga with my hip!

Some of you might know that I have been having trouble with my hip. If you didn't I'll try to make this as short as possible ;) I had my hip replaced when I was 17 due to degenerative arthritis that was caused by a staph infection I got when I was 15 months old. The infection got into my hip joint and I had to have an I&D (incision and drainage) done. My parents were told that I'd have trouble with the joint later in life. Well fast forward 12 years. The trouble started. Basically by the time I was 17 the pain was too much and I couldn't really "be" a 17 year old. I'd have to stay home when my friends went to the mall or the amusement park etc... It was horrible.

I ended up having my hip replaced. I was the second youngest patient on whom my Dr. had ever performed the surgery. Kinda a guinea pig/experimental type deal-o. I did not have the "normal" stem type replacement, but rather a new resurfacing replacement. The stem replacements only last around 10 years so at 17 I was looking at a total hip replacement at least 4 or 5 more times. By then my femur would have been too weak to have it done anymore and I'd be in a wheelchair. So we opted for something different in the hopes that over time the technology would improve and I could have a better replacement still. I still have all my own bone in both my leg and my hip joint, they just added a metal "cap" on the femur and a "cup" in the joint.

Well after 6 years I had worn through the "bearing", it's a thin layer of "goo" between the 2 metal pieces, so they don't rub and grind against each other. I went in and had that replaced. It was another full surgery, but not as long or as intense as the total replacement. I recovered and was fine, until the middle of November this year.

Now, 8 years after that first revision, it seems it's time again to have something done. The metal pieces in my hip are grinding against each other again. There is no pain, just the horrible grinding sound. It feels odd too, but it doesn't hurt. This time is a little different, because we can't afford to fly me all the way back to NJ to see the Dr. that performed the first 2 surgeries. I did find a Dr. here in Illinois that is familiar with a new resurfacing replacement and I have an appointment with him come the first of the year. Hopefully he can either fix what I have or I'm a candidate for the Birmingham Resurfacing Hip replacement. We'll see come Jan 3rd!

Anyway, the reason I explained all this is because it helps to explain my absence from my blog. With the trouble in my hip I haven't felt like stamping much. I guess it's a bit depressing, knowing that I have to have another surgery so soon. I was hoping to have another child this coming year, but now that's pretty much out of the question. It'll all work out in the end, it just kinda sucks right now.

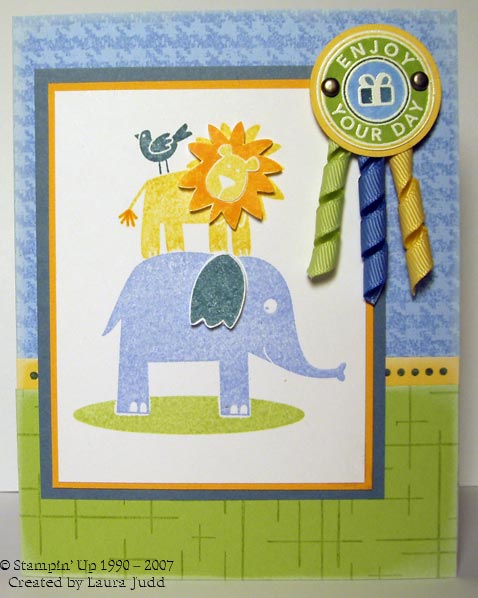
Nathan's 1st Birthday card!

My friend's little boy is turning 1 this weekend and I needed a card. The stacked animals were inspired by many cards on SCS as well as the raised lion head and elephant's ear. What's all mine is the ribbon! There was a thread today about making Korker ribbon bows for little girls hair. So not knowing what those were I had to Google it! I found the instructions (I will be making those bows for Christmas gifts!) and I also thought, hmm those curls would be cool on a card. I would think it's best given person to person rather than sent thru the mail, but with enough padding the curls might survive the USPS. *wink*

Here's how I did it:

1. Cut a length of ribbon about 4 - 6 inches.
2. Put some tape runner adhesive on the ends.
3. Wrap the ribbon very closely (but not overlapping) around a dowel (I used a paintbrush handle)
4. Carefully heat the ribbon for a few minutes with your heat tool, making sure you twirl the dowel around to get all sides.
5. Let it cool for a couple of minutes.
6. Remove from dowel and trim ends.
7. Use on your project!

Unmounting your Wheels - tutorial

Ok I admit it, I'm wheel challenged! I can't use them to save my life! Everytime I tried the image was either not fully stamped or it had lines from the edges of the rubber, it was frustrating. I ended up wasting more CS trying to get it right. I don't make wrapping paper or anything that I'd actually *need* a wheel, so one day I got the brilliant idea to unmount them. I'm pretty sure it wasn't my original idea, but it works for me!


Here's what I do:

1. Find the seam in the rubber. On most wheels it's pretty obvious.(pic 1) Take a sharp craft knife (or paper snips) and score through the glue on the seam. It should cut through pretty easily. (pic 2)


2. Carefully peel back one corner of the rubber at the seam. It should come right off. (pic 3)

3. Snip through the remaining rubber on the seam.


4. Pull the rubber off the wheel. Ususally the adhesive remains on the wheel and the rubber comes off clean. But sometimes some sticky is left. (pic 4)


5. If there is sticky left, just rub it in one direction until it all comes off. (pics 5 & 6)


6. Sometimes I trim the rubber first before mounting it to the EZ Mount (Smart Mount from CHF)It helps to get it trimmed nicely. (pic 7)


7. Mount rubber on EZ Mount foam carefully, making sure to keep it straight. (pic 8)


8. Use Baby Powder to coat the sticky if there is any left.(pics 9 & 10)


9. Trim the EZ Mount around the rubber making sure not to undercut the foam.


10. Clean your newly mounted wheel stamp!


11. Now mount your newly unmounted wheel on the storage system of your choice. I use the binder sheets from Sunday International. They also have an acrylic block 2" x 7" that's perfect for the jumbo wheels! (pics 11 & 12)

Now you can use your wheel just like a long stamp! You can have your wheels and use them too!

Birthday Brag!

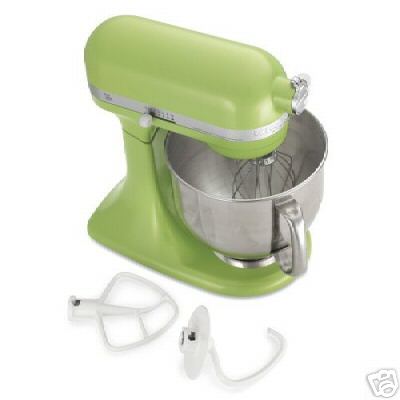
I am one VERY happy person right now! I received some money for my birthday and I thought I would use it towards my SAB purchase, but then I got an email from eBay about a favorite seller. I have been watching this guy for over a year now, just waiting for the time I could order from him. What did I order??? I am getting a Kitchen Aid Accolade 400 watt stand mixer!!!! I have been asking for a Kitchen Aid mixer for 4 years now. Finally we had the money and opportunity to buy it! I'm SO excited! It should be here within a week, so just in time for Christmas cookies!!! I got the Lemongrass Green one, I am hoping to do my kitchen similar to Rachael Ray's in 30 minutes Meals. Right now our kitchen is a blank slate (actually it needs a complete overhaul!) I figured I could get the mixer in whatever color I wanted and design the kitchen to match! LOL A little backwards maybe, but I've wanted to do my kitchen in those colors since I first saw 30 Minute Meals!


Part 2 to my wonderful birthday...
I had asked my FIL and his friend if they could build me an ink pad/marker/reinker storage unit. They enjoy woodworking and I thought they would like the challenge. Well that was months ago. I've been very patient and hadn't said anything until about 10 before my birthday. I asked how they were coming on the storage unit. And Tony says "Well, maybe for your birthday." I said "Oh good, that's in 10 days ;)" LOL Well I guess they hadn't realized that it was that close to my birthday. Anyway fast forward to Thanksgiving. We get back from going to see Casino Royale (great movie btw!)and my FIL and step MIL are there, they give me my birthday card and in it is a printed picture and a note. They said they were sorry for forgetting my birthday and they wanted me to have what I wanted, so they ordered the storage unit for me!!! I can't believe it! So in about a week I'm getting this....


So this year I have had the best birthday I've had in a LONG time. Now I just need the money to fill the storage unit LOL. Actually, I'm about halfway there!

Glitter Ornament Tutorial


Ok here goes, my very first tutorial. I've never written one of these before, but I had so much fun making these ornaments, that I thought everyone should know how! The 1st one is Night of Navy and the 2nd one is Cool Caribbean. I also made one with Marigold Morning, but the picture made it look orange and not very pretty, but it's gorgeous IRL!


First carefully take the metal hanger off your ornament. Then add about 20 drops of reinker. I used Cranberry Crisp for this tutorial. (see pic 1) Then you need to swirl the ink around inside the ornament until it coats the inside completely. (see pic 2) After you have the entire inside coated, turn the ornament upside down so that it can drain into something. I can't tell you how long to do this as it depends on lots of factors, how humid it is, how many drops of reinker you used etc... Just let them drain until there are no more "drips" when you turn it over. (see pic 3)


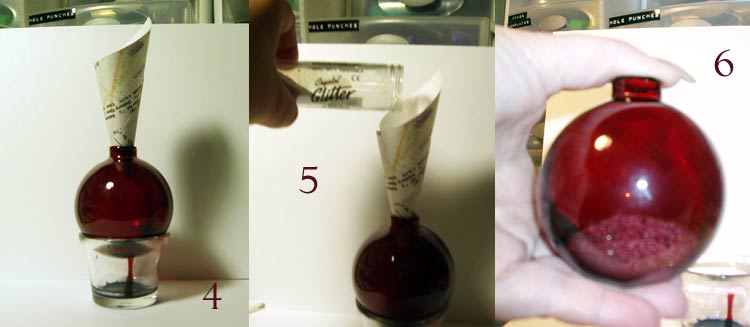
Ok now you need to use some sort of funnel to add the glitter. I just made one from scrap copy paper. (see pic 4) Add about 1 1/2 teaspoon of ultra fine glitter to the ornament. (see pic 5) Now here comes the fun part! Take your thumb and COMPLETELY cover the opening. (I have tiny hands and I can do this, so you should be able to as well.) (see pic 6) Now SHAKE the ornament. Shake it hard, but be careful not to hit it on anything. You want to shake it and not roll the glitter around inside, rolling it will create lines in the glitter, while shaking it will give a smoother look.


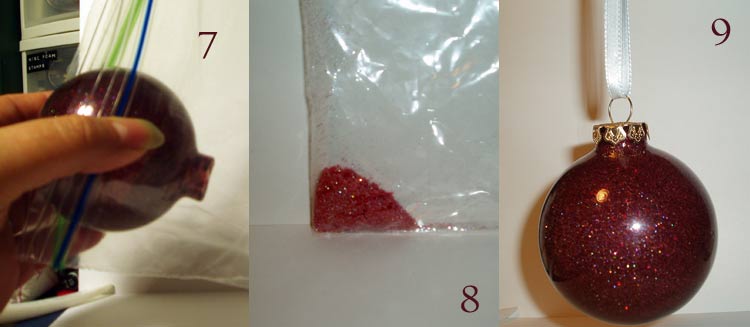
Now you want to have a plastic baggie ready to catch the excess glitter. This is the bonus of this technique. You now have custom colored glitter you can use on other projects! (see pics 7 & 8) Let the ornament dry for a few minutes and replace the metal hanger. Your custom glitter ornament is done! These are so much fun and SO easy to make!
Welcome to my new an improved blog. I hope you can find something useful, insightful, humorous or just plain silly here. Enjoy!
 
Copyright 2009 Inky Dinky Doo All rights reserved.
Blogger Templates created by Deluxe Templates
Wordpress Theme by EZwpthemes